

6 Expert Tips To Get the Perfect Sourdough Ear
Unlocking the secret to achieving the perfect sourdough ear is every baker’s dream. The coveted “ear” – that crisp, elevated edge on artisanal sourdough – is a testament to skill and technique.
In this guide, we’re serving up Six Essential tips that will elevate your sourdough game and have you boasting picture-perfect ears on your loaves every time.
From mastering the art of Fermentation to perfecting your scoring technique, we’ve got you covered. Whether you’re a seasoned sourdough enthusiast or just beginning your baking journey, these tips will pave the way for bakery-worthy results.
Get ready to impress with bread that not only tastes divine but also looks like it’s been plucked from the window of a Parisian boulangerie. Your sourdough game is about to reach new heights – quite literally.
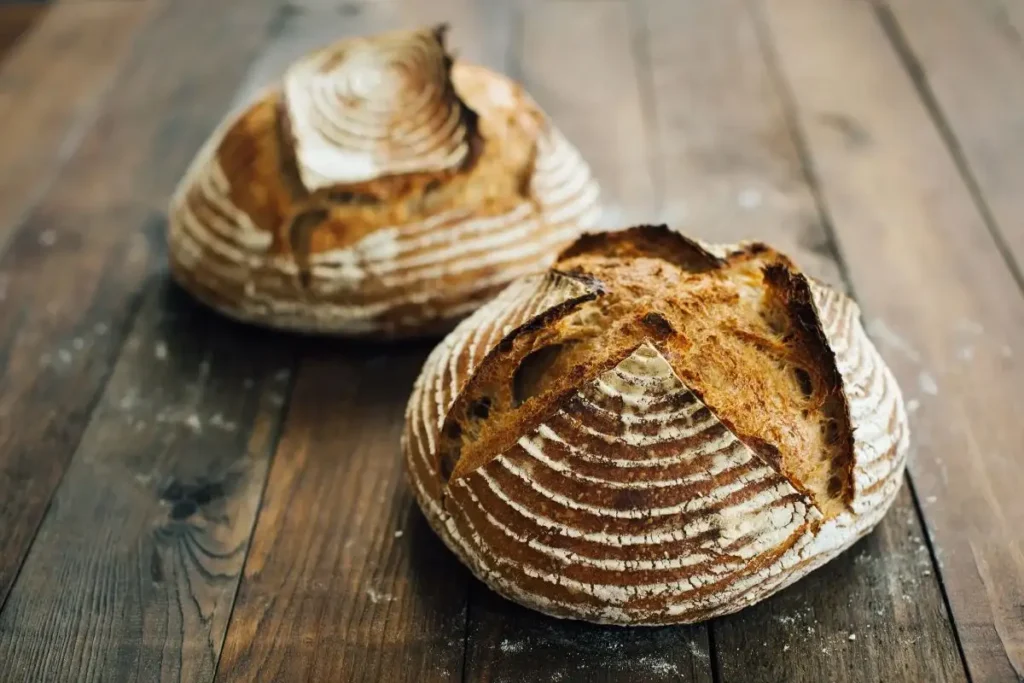
What Is a Sourdough Ear?
The term “sourdough ear” is all about that awesome crispy crust you get on a really well-baked sourdough loaf. It’s like a badge of honor for the bread and the baker’s skills. This special crust happens during baking, thanks to careful fermentation, smart slicing, and just the right baking conditions.
As the dough rises from the wild yeast and bacteria doing their thing, it makes carbon dioxide and puffs up. Slicing the dough (that’s the scoring part) helps it expand in the oven, making room for steam to escape and giving you that cool “ear” on the crust. And nailing the baking temperature, time, and adding some steam makes the crust even better.
6 Essential Tips for Achieving the Ideal Sourdough Ear
Getting that perfect sourdough ear is all about nailing the technique, being precise, and really understanding how fermentation works.
Here are six must-know tips to help you on your quest for awesome sourdough:
- Use Top-notch Ingredients: Start with killer ingredients. Get yourself some high-quality flour, the unbleached and unbromated kind is best. All-purpose flour does the job, but playing around with different types like bread flour or whole wheat flour can give your bread some cool flavors and textures. And don’t forget about your sourdough starter – make sure it’s well-fed and good to go before mixing it into your dough.
- Respect the Fermentation Time: The heart of sourdough is all about letting it ferment. Stick to the timeline – aim for 8 to 12 hours, adjusting based on how warm it is and the flavor you’re going for. Let that wild yeast in your starter do its thing, bringing out that tangy kick and airy texture that makes sourdough special. Sticking to a consistent fermentation schedule is key for a reliable ear.
- Nail the Shaping Game: Shaping the dough is where the real magic happens. Pay close attention to the shaping process, making sure it’s nice and tight with a clear seam. Tension in the dough is crucial for a strong ear. Try different shaping techniques, like pre-shaping and final shaping, until you find what works best for your style and gives you that perfect ear.
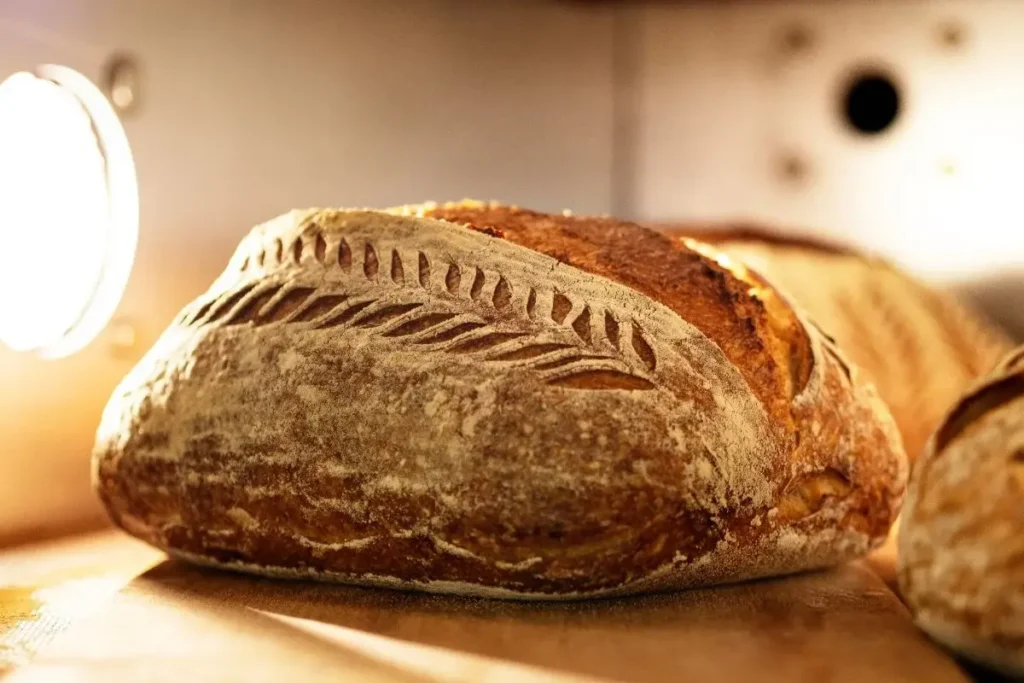
- Get Creative with Scoring: Scoring, or cutting the dough before baking, is a big deal for the ear. Try out different patterns to get cool designs on your loaf. A good, deep cut lets the dough expand gracefully, making a killer ear. Remember, the angle, depth, and pattern of your cut affect how it looks, so don’t be afraid to get artistic.
- Create the Right Baking Setup: Setting up your baking environment is crucial for that ideal sourdough ear. Make sure your oven is good and hot before you put in your shaped and scored dough. To give your crust that extra oomph, add some steam during the first part of baking – you can do this by putting a tray of water in the oven or using a Dutch oven. Steam helps make a crispy crust that sets the stage for your ear to shine.
- Keep Tweaking for Better Results: Getting that perfect sourdough ear is a learning process. After each bake, take a good look at your results. Check out the ear, the crust, and the overall flavor. If the ear isn’t what you hoped for, think about adjusting things like how long you let it ferment, your shaping techniques, or the way you score it. Take good notes, and with each batch, fine-tune your process to consistently make awesome bread.
How to Score Sourdough to Get a Perfect Ear | Step by Step
Scoring sourdough is a crucial step in achieving that coveted artisanal look and texture, characterized by a beautiful “ear” or crack along the bread’s surface. Mastering the technique requires attention to detail and practice. Here’s a step-by-step guide on how to score sourdough for a perfect ear:

- Prepare Your Dough: Ensure your sourdough has undergone proper fermentation and proofing. A well-proofed dough with good structure is more likely to result in a successful ear during scoring.
- Choose the Right Tools: Select a sharp blade or razor for scoring. A lame, which is a tool specifically designed for this purpose, is commonly used. Make sure your blade is sufficiently sharp to create clean cuts without tearing the dough.
- Preheat Your Oven and Baking Surface: A hot oven and preheated baking surface contribute to better oven spring and a well-defined ear. Preheat your oven and baking vessel adequately, such as a Dutch oven, to create a steamy environment that enhances crust development.
- Score at the Right Time: Score your dough just before it enters the oven. The dough should be slightly chilled for easier handling, but not overly cold. A quick, confident cut is essential to prevent dragging or tearing.
- Choose a Scoring Pattern: Decide on a scoring pattern that complements the shape and size of your loaf. Common patterns include a single slash, cross, or spiral. Experiment with different patterns to find what works best for your dough.
- Depth and Angle Matter: Make sure your cuts are deep enough to allow the dough to expand but not so deep that it collapses. The angle of your blade also influences the ear’s formation; a shallow angle can result in a more pronounced ear.
Why isn’t My Sourdough Getting a Good Ear? 4 Main Reasons
Getting that perfect ear on your sourdough is a bit tricky, and if your loaves aren’t turning out the way you want, a few things might be going on.
Let’s look at some common issues and how to fix them to up your sourdough game.
Shaping Troubles
If your sourdough isn’t sporting a distinctive ear, your shaping might be the culprit. Shaping is super important to create tension in the dough, letting it expand just right during baking. If your shaping is a bit loose or inconsistent, your ear might not show up like you want.
Solution: Be meticulous with your shaping. Make sure you’re creating good tension on the surface, forming a tight and well-structured dough ball. Try out different shaping techniques, and don’t hesitate to tweak things until you find what works best for your dough.
Scoring Slip-ups
Scoring is an art that seriously affects your sourdough ear. If your cuts are too shallow, too deep, or not in the right place, it can mess with how the dough expands during baking, giving you a less noticeable ear.
Solution: Play around with different scoring patterns and depths. Go for a confident, quick cut that lets the dough expand nicely. Also, think about how wet your dough is – wetter dough might need deeper scoring.
Fermentation Fumbles
Fermentation is a delicate balance, and if you don’t get it right, it can mess with your sourdough structure, including the ear. Dough that’s under or over-fermented might not have the strength to make a well-defined ear.
Solution: Stick to a consistent fermentation schedule, adjusting for things like room temperature and the flavor you want. Check if the dough is ready using the poke test, making sure it’s not too firm or too slack.
Incorrect Baking Environment
Your baking setup is crucial for that perfect ear. If there’s not enough steam, your oven temperature is uneven, or you didn’t preheat properly, your dough might not expand like it should.
Solution: Invest in tools like a Dutch oven or use a tray with water to add steam in your home oven. Keep a close eye on the temperature, and make sure your oven is fully preheated before baking.
Why Is Steam So Important For A Sourdough Ear?
Steam plays a big role right from the start of baking, influencing how the crust forms and the iconic sourdough “ear” develops. When the dough hits the oven, the water on its surface quickly turns to steam in the high heat.
This fast evaporation does two things to the dough. First off, it creates a moist environment around the bread, keeping the crust soft for a longer time. This softness is important for the dough to expand, allowing it to rise and form that sought-after “ear.”
Secondly, the steam moisture slows down the crust from setting too quickly. A delayed crust means the bread can keep expanding in the early baking stage, helping that ear to develop nicely. The steam also stops the crust from getting hard too soon, letting the yeast keep producing carbon dioxide, which leads to a better rise in the oven.
And that’s not all—steam also helps with caramelization, giving the crust a deeper flavor and that appealing golden-brown color. This delicate dance between moisture and heat sets the scene for a crust that not only looks amazing but also has the perfect mix of crunchiness and chewiness.
To make the most of steam in your sourdough baking, try tricks like putting a pan of hot water in the oven at the beginning or using a special steam injection system if your oven has one. Understanding and getting the hang of steam in the baking process is a crucial step to consistently nailing that delightful sourdough ear, turning a basic loaf into a masterpiece.
Frequently Asked Question (FAQs)
How long does it take to achieve the Perfect Sourdough Ear?
Crafting the perfect sourdough ear varies but typically takes 12-24 hours, considering fermentation and baking time.
How do I Troubleshoot a Sourdough that lacks an Ear?
Check fermentation time, dough hydration, and oven steam. Adjusting these factors can enhance ear development.
Why is my Sourdough Dense without a Distinct Ear?
Possible reasons include overworking the dough, insufficient fermentation, or inadequate scoring. Adjusting these factors can help.
Why is My Sourdough Ear So Big?
The size of the sourdough ear can be influenced by factors like high hydration, vigorous fermentation, and effective scoring. A larger ear is often a result of a well-fermented, adequately scored dough, creating optimal conditions for expansion during baking.
Expert Tips to Get the Perfect Sourdough Ear | Final Thoughts
In the quest for the perfect sourdough crust, every baker wants to nail that crispy, raised edge – a real sign of skill and technique. This guide spills the secrets, giving you six must-know tips to up your sourdough game. From nailing fermentation to getting creative with your cuts, each step is like adding a special touch to your artisan baking canvas.
Whether you’re a seasoned pro or just starting out, these tips will get you bakery-quality results. Remember, perfecting your technique is a journey. Fine-tune your skills, try new things, and with each batch, you’ll be one step closer to baking bread that not only tastes amazing but also looks like it came from a fancy French bakery.